
Remove Old Car Tint Without Damaging the Glass or Defroster
Protect the cabin, warm one edge, lift with a plastic tool and peel slowly; includes separate glue cleanup and rear-defroster stop signs.
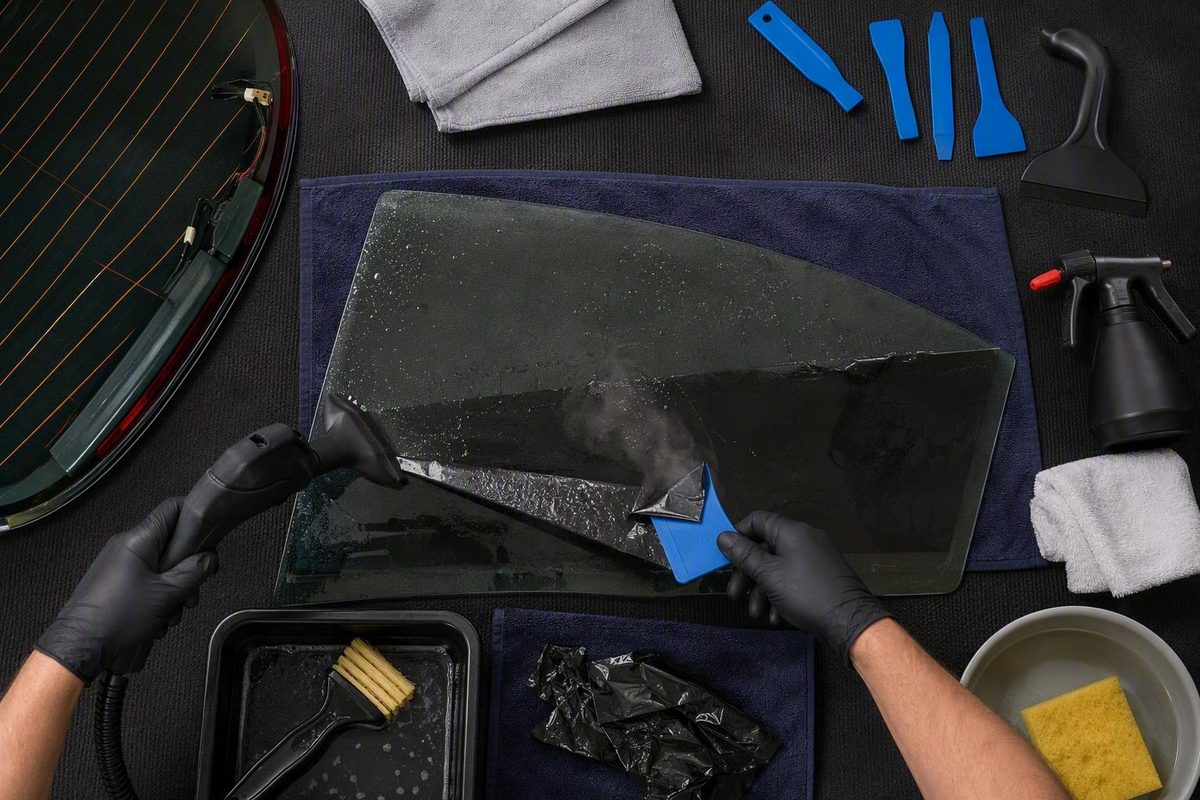
A conservative way to take off aftermarket window tint is to protect the cabin, soften one edge with controlled steam, lift the film with a plastic tool, and peel slowly while keeping the separation line warm. Remove any adhesive afterward as a separate step. Do not force dry film from the glass; stop if the glass shows stress, a rear defroster conductor begins to lift, or brittle film repeatedly shreds despite reheating.
Quick answer: Soften, peel, then clean
Use this six-step process:
- Confirm that the tint is applied film. Factory-colored privacy glass is part of the glass and cannot be peeled away. If you cannot identify what is installed, ask a qualified tint shop.
- Protect the vehicle interior. Cover upholstery, door panels, trim, electronics, speakers, and the rear deck.
- Warm an edge with controlled steam. Keep the steamer moving instead of concentrating heat in one place.
- Lift a corner carefully. Start with a plastic tool suitable for glass rather than a metal razor.
- Peel slowly while warming the separation line. Maintain a broad grip and try to remove the film in large pieces.
- Clean the residual adhesive. Use the least aggressive cleaner confirmed compatible with the glass and nearby materials.
Treat film removal and adhesive removal as distinct jobs. Steam may help some glue leave with the film, but it will not necessarily produce residue-free glass. Slow peeling after softening the adhesive is preferable to forceful dry pulling, which is more likely to tear the film and leave fragments behind.
Stop rather than adding more force or concentrated heat if:
- A new crack appears or the glass makes an unusual sound
- A rear-window defroster line moves or lifts
- The film repeatedly breaks into small pieces after careful reheating
- Moisture is collecting around electronics or glued interior materials
- You cannot confirm that a cleaner is compatible with the glass, coatings, seals, or trim
Tools, preparation, and safety checks
Gather these supplies before beginning:
- Garment or upholstery steamer
- Heat-resistant gloves
- Eye protection
- Clean microfiber cloths
- Absorbent towels, plastic sheeting, or other protective coverings
- Plastic lifting tool suitable for glass
- Automotive glass cleaner
- Mild cleaner or adhesive remover whose label confirms compatibility with the relevant glass, coatings, seals, trim, and upholstery
- A suitable container for removed film and used towels
Work in a stable, well-lit place. Cover the seats, door panels, dashboard or rear deck, speakers, switches, electrical equipment, painted trim, and headliner edges. Position towels and coverings so condensation and cleaner flow away from seams, switches, speakers, and electronic modules.
Before touching rear-window tint, you may switch on the defroster and note any areas that appear not to function. Turn the defroster off before removal. This is an informal before-and-after observation, not a standardized diagnostic test. If you already suspect a fault, use vehicle-specific service information or consult a qualified technician.
Steam can cause serious burns, and excessive or concentrated heat may stress or crack glass. Wear gloves and eye protection, direct the steamer away from your body, keep your free hand out of the steam path, and keep the nozzle moving. No single temperature, distance, or heating time is established as safe for every steamer, film, adhesive, and glass assembly (Rvinyl’s automotive tint-removal guidance).
Follow the steamer manufacturer’s instructions. Stop if the glass, seal, trim, or nearby material reacts unusually. Do not move the nozzle closer or hold it in one place merely because the film is stubborn.
Treat chemical-label instructions as mandatory. Check ventilation, gloves, eye protection, application restrictions, storage, and disposal requirements before opening a cleaner. Test it in an inconspicuous area, and do not assume a household glass product is suitable for automotive coatings, rubber seals, painted trim, or upholstery. Equipment and chemical manufacturers’ safety instructions take priority over general removal advice.
Do not make a metal razor part of the standard tool kit. Blades can scratch glass and are particularly risky on rear windows, coated glass, or panes containing electrical conductors. A plastic, glass-compatible lifting tool is the more conservative starting point.
Step by step: Remove tint from a side window with steam
Finish one pane before moving to another so you can adjust if the film or adhesive behaves unexpectedly.
- Lower the window slightly. Expose enough of the upper edge to reach the film. Do not lower the glass so far that the edge disappears inside the door.
- Protect the door panel and seal. Place absorbent material beneath the glass. Keep condensation away from switches, speakers, and the window mechanism.
- Warm one upper corner. Apply steam to a small area while continuously moving the nozzle. The objective is to soften the adhesive, not make the pane extremely hot.
- Lift enough film to grip. Use a plastic lifting tool or another method confirmed safe for that glass. Avoid digging into the surface or pressing against the seal.
- Raise the window as needed. Once the upper edge is free, reposition the glass so you can reach the full sheet and its lower edge.
- Peel slowly and evenly. Direct steam toward the line where the film is separating from the glass, rather than heating a large area far ahead of the peel.
- Maintain a broad grip. If working alone, hold the film securely with one hand and operate the steamer with the other, keeping both hands outside the steam path. Do not jerk a narrow strip.
- Finish the lower edge carefully. Keep steam, film fragments, and cleaner from entering the window slot.
- Set the removed film aside and inspect the pane. View it under angled light because a clear-looking window may still carry adhesive.
For 3M Ceramic XP film specifically, the manufacturer recommends steam-assisted removal and a pull angle of approximately 90 degrees from the window surface. That is product-specific guidance, not a universal angle for every film or adhesive system (3M Ceramic XP technical data sheet).
If the film tears, stop pulling. Rewarm the next small section, lift a wider edge, and resume with less force. Removing broad pieces can reduce loose fragments, but do not expect steam to carry away every trace of adhesive.
Side glass, rear glass, or windshield: Use the right risk level
The basic soften-and-peel principle does not carry the same risk on every vehicle window.
| Window location | Main hazards | Appropriate DIY approach | Reasons to stop |
|---|---|---|---|
| Ordinary side glass | Scratches, damaged seals or trim, steam burns, and moisture inside the door | Protect the door, use controlled steam, lift with plastic, and peel gradually | Cracking sounds, visible glass stress, seal movement, an unknown coating, or repeatedly shredding film |
| Rear glass | Defroster conductors, embedded antennas, rear-deck electronics, headliner moisture, and restricted access | Cover the rear deck and electronics, avoid metal blades, use low force, and control condensation | A conductor moves or lifts, the film is brittle or heavily bonded, residue remains over sensitive lines, or the antenna layout is uncertain |
| Windshield or sensor-equipped glass | Sensors, antennas, coatings, laminated construction, dashboard electronics, and limited working space | Obtain vehicle-specific guidance or use an experienced professional | Uncertain construction, nearby sensors, specialty coatings, poor access, or any sign of glass stress |
Rear-window defroster grids contain thin conductive lines on the glass. Excessive force, metal blades, and aggressive scraping can cut, lift, or otherwise damage them. Never scrape across the grid, and stop immediately if a line appears to move with the film (Elite Window Tintz’s explanation of rear-defroster removal risks).
Brittle, bubbling, or heavily bonded film over a rear defroster is a strong reason to hire a professional. The same applies to glass containing embedded antennas or unfamiliar electrical elements. Low force matters more than completing the job in one session.
Do not transfer the side-window procedure automatically when the glass construction or nearby equipment is uncertain. Vehicle-specific guidance or professional removal is the safer choice in those cases.
Control cabin moisture as carefully as heat. Use only enough steam to maintain the active peel, ventilate the cabin, wipe condensation promptly, and stop if moisture collects near electronics or bonded trim.
Remove the leftover adhesive without damaging the car
Residual glue is common enough that cleanup should be planned separately, especially if replacement film will be installed.
Use a least-aggressive-first sequence:
- Let the glass stabilize. Do not immediately flood very warm glass with cleaner.
- Start with a mild approach. Use a label-approved cleaner and clean microfiber cloth.
- Test compatibility. Apply the product in a small, inconspicuous area and check nearby materials that could receive drips.
- Work in small sections. Use only enough cleaner to soften the residue, then lift it into the cloth rather than spreading it across the pane.
- Escalate cautiously. Use a dedicated adhesive remover only after confirming compatibility with the particular glass, coatings, seals, trim, and upholstery.
- Finish with normal glass cleaning. Wait until all adhesive has been removed, and use fresh cloths so glue is not redistributed.
Use an automotive film adhesive remover only when its label permits the actual glass and surrounding materials. A solvent suggested for building windows may damage vehicle trim or coatings.
Prevent runoff onto rubber seals, upholstery, painted trim, switches, speakers, the headliner, and electronics. Follow the cleaner label for ventilation, protective equipment, application, storage, and disposal. Never mix cleaning chemicals.
On rear glass, wipe gently and do not scrape across the defroster grid. If adhesive remains directly over conductors or an embedded antenna, pause and consult a tint-removal professional instead of escalating to a blade, abrasive pad, or greater force.
Troubleshooting tint that tears, smears, or will not lift
| Problem | What to do |
|---|---|
| Corner will not lift | Reheat a small area while keeping the steamer moving. Try again with a plastic lifting tool rather than increasing force or immediately reaching for a blade. |
| Film tears into strips | Use shorter heated sections, establish a wider grip, and peel more slowly. Stop if brittle film continues to shred. |
| Adhesive smears | Stop adding heat and let the area stabilize. Use a compatible cleaner in small sections and lift the softened glue with microfiber. |
| Film hardens again in cold conditions | Reduce the working area and keep the separation line warm. Postpone the job if the adhesive will not remain workable. |
| Too much interior moisture | Stop steaming, dry the glass and coverings, and ventilate the cabin. Do not continue saturating the headliner, electronics, speakers, or glued trim. |
| Haze remains after cleanup | Determine whether it is glue, tiny film fragments, scratches, or etching. Additional scraping will not repair damaged glass and may worsen it. |
Cold conditions can make adhesive harder to keep soft, while excessive heat can make glue messy and increase stress on the pane. Aim for controlled softening directly at the active peel line, not maximum heat across the whole window.
Repeated failure is itself useful information. If careful reheating and a broader grip do not stop the film from shredding, continuing may turn a difficult removal into damaged glass, trim, or conductors.
Inspect the glass and decide whether it is ready for new tint
After removing the adhesive, clean the pane with a compatible automotive glass cleaner and inspect it in bright light from several angles. Look for:
- Remaining adhesive
- Film fragments around seals and edges
- Haze or streaks
- Scratches or etching
- Loose or displaced seals
- New cracks or other signs of glass stress
- Damage to defroster lines or embedded components
Check the rear defroster again and compare it with your informal pre-removal observation.
Do not install replacement film until the glass is thoroughly clean and suspected damage has been evaluated. Residual adhesive may contribute to haze, streaks, bubbles, an uneven appearance, or poor bonding beneath the new film.
Handle removed film, used towels, and cleaner-contaminated coverings according to the cleaner’s label and applicable local waste guidance. Disposal requirements depend on the products used, so do not make assumptions about the correct waste stream.
When professional removal is the safer choice
Request an assessment from an experienced tint shop when you encounter:
- Brittle or heavily bonded film
- Film that repeatedly shreds after controlled reheating
- Rear tint bonded over delicate defroster conductors
- Embedded antennas or unfamiliar electrical elements
- A windshield or other pane with uncertain construction or coatings
- Cracking sounds, a developing crack, or other signs of glass stress
- A conductor that moves, separates, or lifts
- Persistent adhesive over sensitive components
- Uncertainty about cleaner compatibility
- Restricted access that makes low-force peeling impractical
- Condensation threatening a headliner, sensor, speaker, or electronic module
Ask how the shop protects defrosters, removes old adhesive, and documents pre-existing glass or conductor damage.
Ask for a quote identifying the panes, adhesive cleanup, defroster risk and preparation for new film. Keep removal separate from the price of replacement tint; brittle rear-window film can require substantially more work than intact side-window film.
Can I use the same method to remove tint from home or commercial windows?
Not automatically. Architectural glazing may be low-E, coated, laminated, tempered, or part of an insulated glass unit. Its frames, seals, access conditions, and response to heat can also differ substantially from those of automotive glass. Excessive heat may create thermal stress or affect insulated-glass seals, while unsuitable blades or solvents may damage coatings (Window Film Depot’s architectural film-removal guidance).
Identify the glass and film system before beginning, then follow guidance specific to that installation. A controlled warm-and-peel approach may suit some ordinary, accessible panes, but automotive instructions should not be transferred directly to coated, insulated, specialty, overhead, or difficult-to-access architectural glass. Use a window-film professional when the glazing type or safe removal method is uncertain.